If you’re looking to run virtual machines directly from your Windows 11 PC, Hyper-V is a great built-in tool from Microsoft. It allows you to run multiple operating systems on the same hardware, ideal for testing, development, and sandboxing. In this guide, we’ll walk you through how to enable Hyper-V on Windows 11 in just a few steps.
Table of Contents
Be sure to read our previous blog post on how to install and configure the Hyper-V Role on Windows Server 2025.
What is Hyper-V?
Hyper-V is a hardware virtualization technology developed by Microsoft that allows you to create and manage virtual machines (VMs) on a physical computer. It allows you to run multiple operating systems simultaneously on a single device, each in its own isolated environment. Hyper-V is commonly used for testing, development, server management, and creating virtualized environments, making it a powerful tool for developers and IT professionals. It is included in the Pro, Enterprise, and Education editions of Windows 10 and 11.
System Requirements
Before enabling Hyper-V on your Windows 11 device, it’s important to verify that your system meets the necessary requirements. Below are the prerequisites for running Hyper-V on Windows 11:
- Windows 11 Pro, Enterprise, or Education edition
- A 64-bit processor with Second Level Address Translation (SLAT)
- Virtualization enabled in BIOS or UEFI
- At least 4 GB of RAM (8 GB recommended, more is better for VM performance)
Note: Windows 11 Home doesn’t officially support Hyper-V, though workarounds exist.
Step-by-Step: How to Enable Hyper-V on Windows 11
There are three methods available to enable the Hyper-V feature on a Windows 11 system: through Windows Features, using Windows PowerShell, and via the DISM command. In this guide, I will cover all three methods to enable Hyper-V on Windows 11.
Method 1: Enable Hyper-V on Windows 11 using Windows Features
To enable Hyper-V on Windows 11 using Windows Features, follow these steps:
Click on the Start menu, then select Settings to open the Settings app.

Click on Systems, scroll down and then click Optional features.

Under the Related settings section, click on More Windows features setting.

In the Windows Features window, scroll down to Hyper-V and check the box next to it.
Make sure the Hyper-V Management Tools and Hyper-V Platform checkboxes are selected.
Click OK and wait for the installation process to complete.

Once the installation is complete, click Restart Now to restart your Windows 11 computer and enable the Hyper-V feature.

That’s it! You have successfully enabled the Hyper-V feature on your Windows 11 device.
Method 2: Enable Hyper-V on Windows 11 Using PowerShell
On the Windows 11 desktop, right-click the Start button and select Windows PowerShell (Admin) to launch Windows PowerShell with administrative privileges.

In the PowerShell window, type the following cmdlet and hit Enter:
Enable-WindowsOptionalFeature -Online -FeatureName Microsoft-Hyper-V-AllPowerShell will execute the cmdlet and begin the process of enabling the Hyper-V feature.
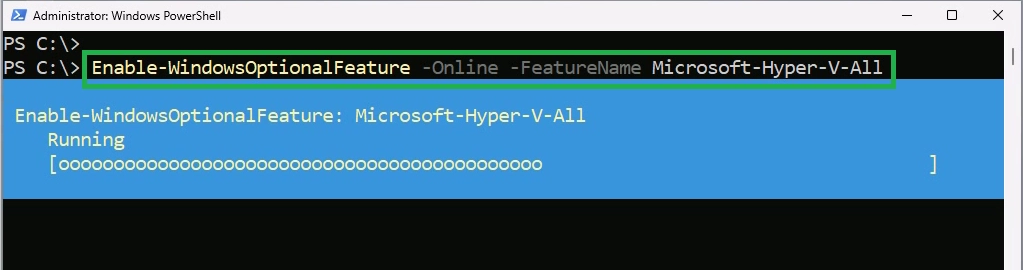
If successful, you will be prompted to restart your Windows 11 device. Type “Y” and press Enter to restart the Windows 11 device.

Method 3: Enable Using Command Prompt (DISM)
Open Command Prompt as Administrator.

In the command prompt window, type the following command and hit Enter:
DISM /Online /Enable-Feature /FeatureName:Microsoft-Hyper-V /All
Once the command completes successfully, restart your Windows 11 device.

How to Configure Hyper-V Settings
After enabling the Hyper-V feature on your Windows 11 device, you can adjust settings to optimize your virtual machines for maximum performance.
Hyper-V Settings: You can change the default locations of your virtual hard disk and virtual machine configuration files, configure NUMA spanning for storage migration, and enable enhanced session mode.

Virtual switch Manager: Hyper-V uses a virtual switch to connect virtual machines to your physical network, allowing you to create External, Internal, or Private switches.

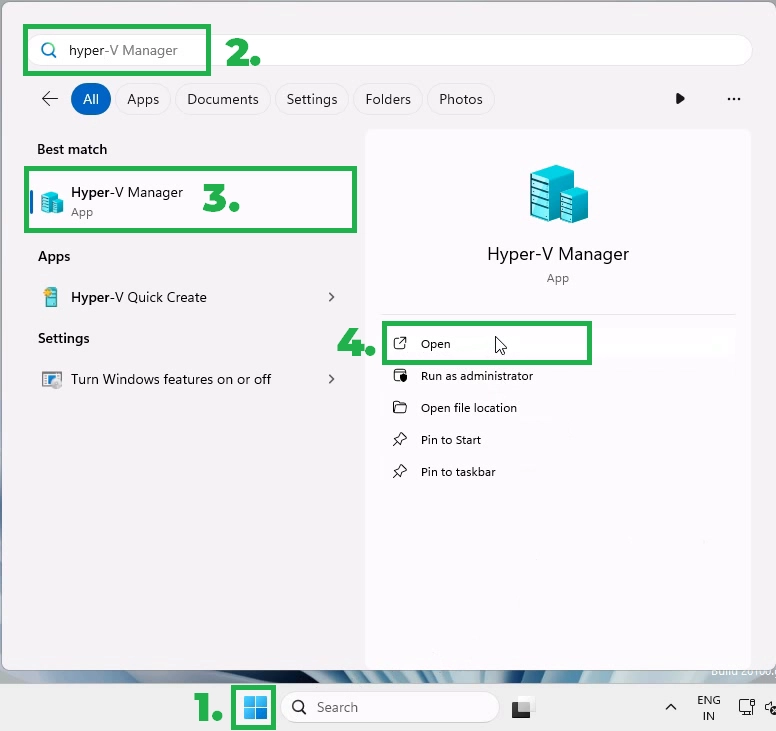
Open the Start menu, type Hyper-V Manager, and click on it to open the Hyper-V Manager console.
From the Hyper-V Manager console, you can start creating and managing virtual machines.

Conclusion:
Enabling Hyper-V on Windows 11 is quick and straightforward—provided your system is compatible. Whether you’re testing software, exploring different operating systems, or building development environments, Hyper-V offers a fast and flexible virtualization platform with native Windows support. You can now easily test various OS environments, create development sandboxes, or isolate risky tasks within virtual machines.
Have questions or run into any issues? Feel free to leave them in the comments below!
Want to learn how to create your first VM with Hyper-V on Windows 11? Stay tuned for our upcoming tutorial!