Being an Exchange administrator, you’ve to struggle every day to keep the Exchange server up and running, without any glitches. Unfortunately, at times, Exchange database gets corrupted or dismounted due to unforeseen reasons, such as hardware/software issues, abrupt system shutdown, virus infections, etc. In such situations, you need to plan a safe and quick recovery to ensure business continuity.
Though you can use Exchange’s native utilities, such as ESEUtil, to repair the database, the process may take a lot of time, resources, and efforts. In addition, there is no surety that the database will be mounted after the repair process. So, for quick and safe database repair and recovery, you can rely on third-party Exchange server recovery software. One such software is Stellar Repair for Exchange that can repair the corrupt or dismounted database, without any data loss. Let’s take a detailed look at this software, based on its features, functionality, and other aspects.
About Stellar Repair for Exchange Software
Stellar Repair for Exchange, a software recommended by MVPs across the world, can repair corrupt Exchange database files of any Exchange server version – 2019, 2016, 2013, and earlier. It easily scans the corrupt EDB file of any size and recovers all the mailbox items such as emails with attachments, calendar items, contacts, notes, journals, tasks, and public folders. It exports the repaired EDB file to PST or directly to live Exchange server and Office 365 account.
The software comes in three editions: Corporate, Technician, and Toolkit. The Corporate and Technician editions offer similar features, except that Technician edition comes with lifetime license and recovery of unlimited mailboxes. The Toolkit is the most advanced edition which, apart from unlimited mailboxes recovery and lifetime license, comes with specialized tools such as EDB to PST converter, OST to PST converter, mailbox extractor from backup, and password recovery for MS Exchange.
Installation of Software – Quick and Easy
Stellar Repair for Exchange software is easy to download and install. The size of the software installation file is quite small. After agreeing to the terms and conditions, the software is installed in a few simple clicks and takes only a few minutes.
However, before installation, the following minimum system requirements must be fulfilled:
- Processor: Intel compatible (x86, x64)
- Operating System: Windows 10, Windows 8.1, Windows 8, or Windows 7, Windows Server 2016, Windows Server 2012, or Windows Server 2008
- Memory: 8 GB (recommended) 4 GB (minimum)
- Hard Disk: 250 MB of free space
Interface – Intuitive and Easy to Navigate
The interface of a software plays a major role in easing the given process. The interface of Stellar Repair for Exchange is quite simple and similar to the Outlook application. Most of the functionalities and options are available on a single screen. This is highly beneficial as the user does not have to juggle between multiple popups and windows.
Repairing EDB File – A Simple & Quick Process
After installation, the software is ready to repair the corrupt EDB file. The process is easy and requires you to follow some simple steps. Let’s take a look at the process.
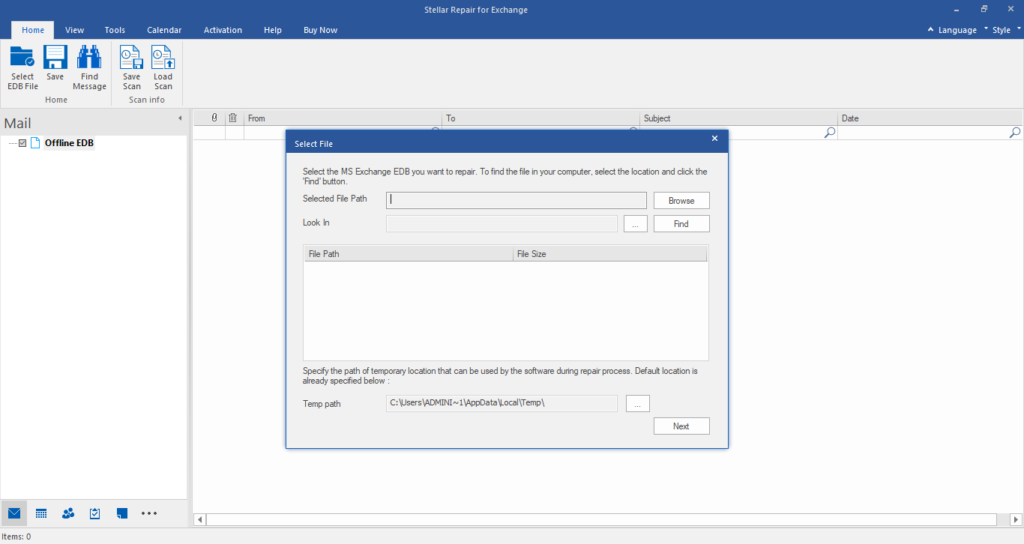
When you launch the software, it directly asks you to select the EDB file. You can click Browse to select the corrupt EDB file, if you know the location of the file. Otherwise, select the Find button and the software automatically locates all the files stored in the selected volume, folder, or sub-folder.
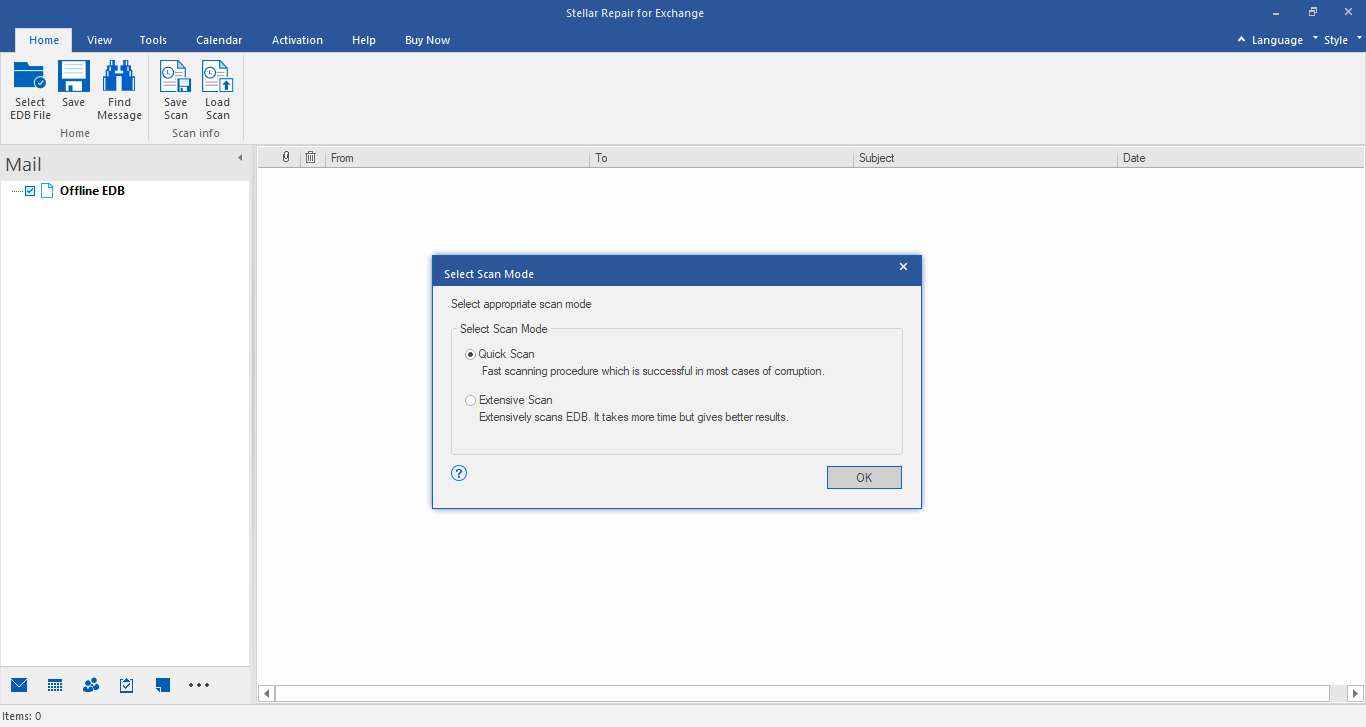
After selecting the corrupt EDB file, you need to click on Next button. Then, select Quick Scan (for faster scanning process) or Extensive Scan (for better results). And click OK to begin the scan and repair process.
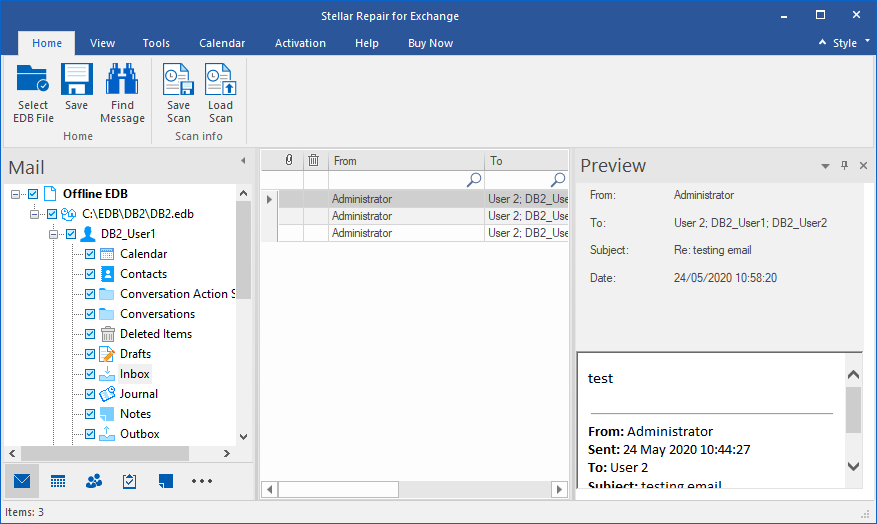
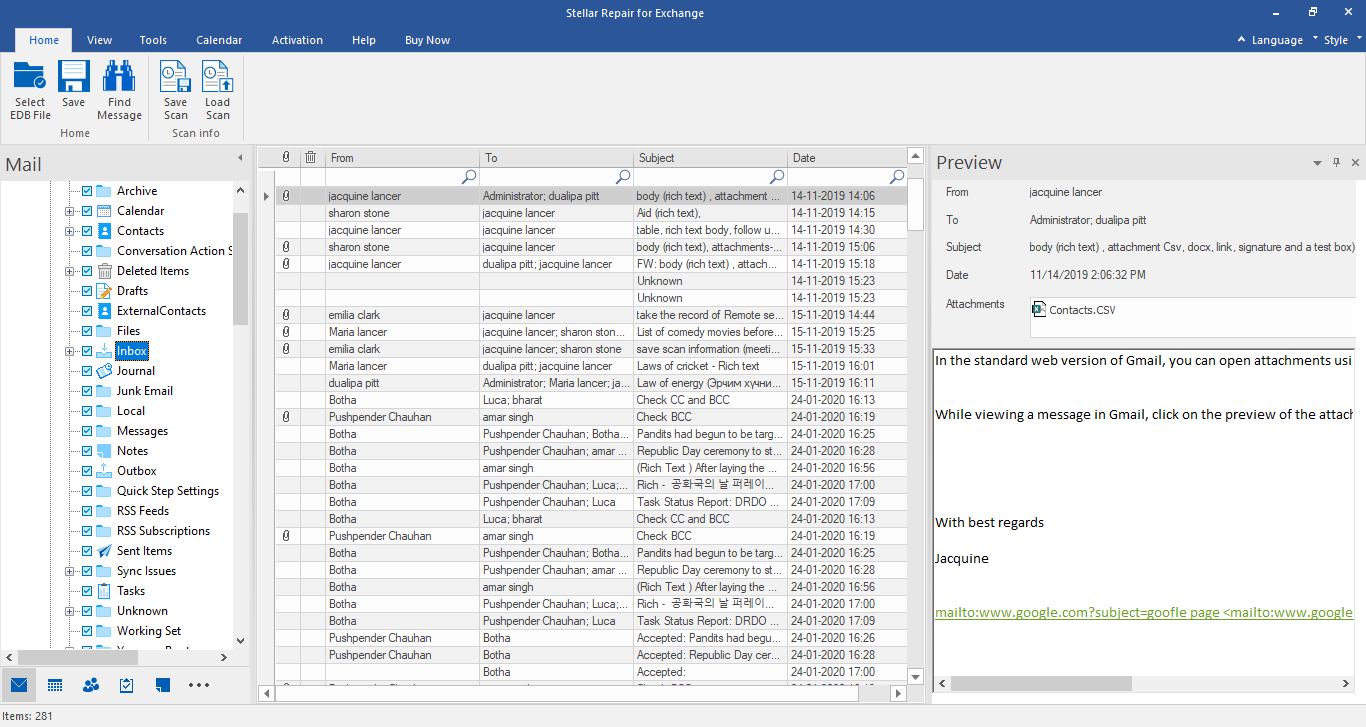
After the scan, the software lists all the recoverable items in a three-pane window. The left pane shows all the recoverable mail folders. The middle pane displays all the items in the selected folder. And the right pane displays the content of selected mail item. You can preview all or specific mailbox items before saving.
After the scan, you can also perform the following tasks:
- Search and Save: You can search and save any specific emails from the recovered files. For this, click on Find Message from Home Menu, mention the criteria to search for desired mails from the provided attributes, and click the Search option to start the search. The results of the search will appear in the window. For saving the search results, right-click on the messages to save them individually or you can click the Save icon from the file menu, select the format, specify the destination folder, and click ‘OK.‘
- Apply Filters: You can also apply filters to include or exclude mailboxes and mail items from saving, based on email address, date range, or select to include/exclude Junk and Deleted emails.
Saving Mailboxes to PST format
From the left pane, choose the mailboxes you want to recover and click the Save button from the toolbar. This opens a Save As window. In this, select Save as PST and then click Next.
Now, click Browse to select a location to save the selected mailboxes and then click OK.
In the Save Mailboxes window, you can get the option to set the priority for mailbox recovery. This helps to export and save the important mailboxes first. After changing the priority, click on Next to continue.
In the Save window, you’ll see the progress of the mailbox saving process. The software facilitates parallel processing and processes up to 4 mailboxes simultaneously.
Exporting Mailboxes to Live Exchange
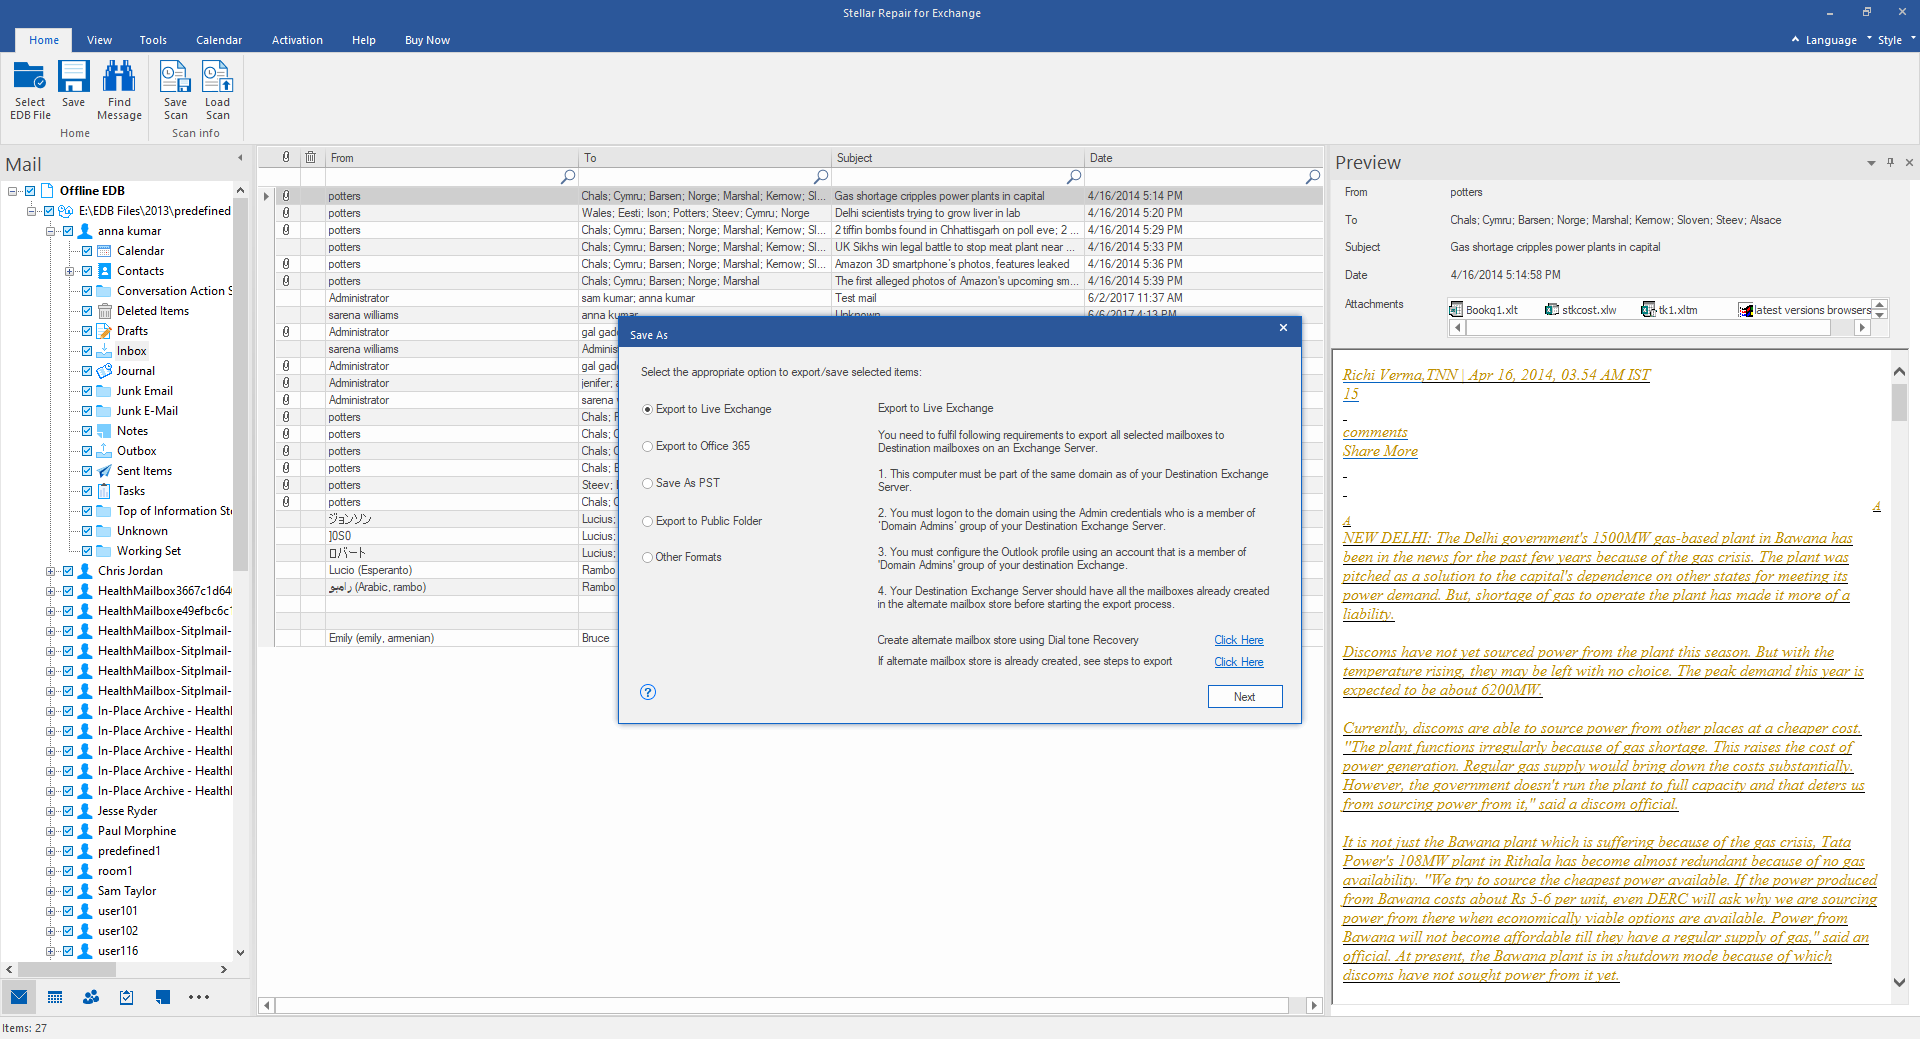
To save mailboxes directly to a live Exchange, select the recovered mailboxes after the scan and then click Save from the main menu. In the Save As dialog box, choose Export to Exchange Server and click Next.
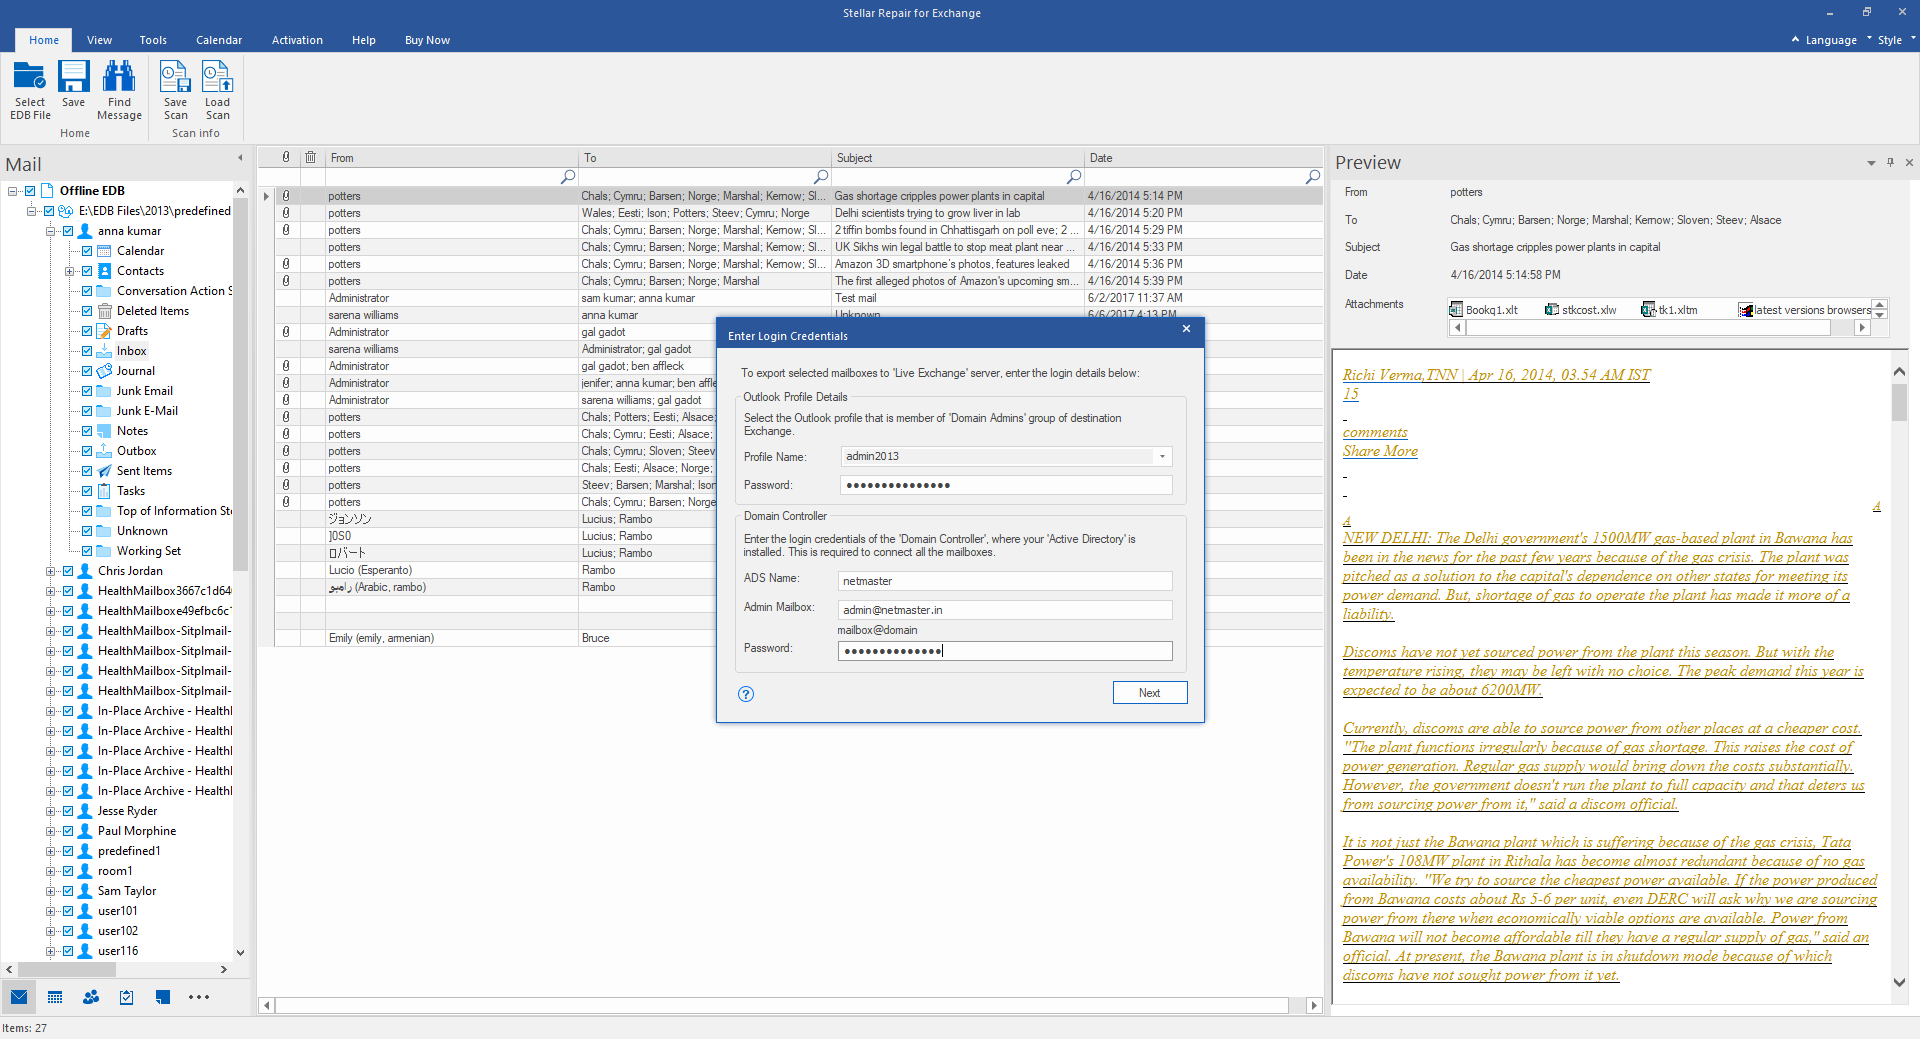
In the Enter Login Credentials dialog box, enter the login credentials for Live Exchange. Then, select the configured Outlook profile with Administrator Access, enter the password, and enter ADS Name, Admin Mailbox, and Password. Then click Next.
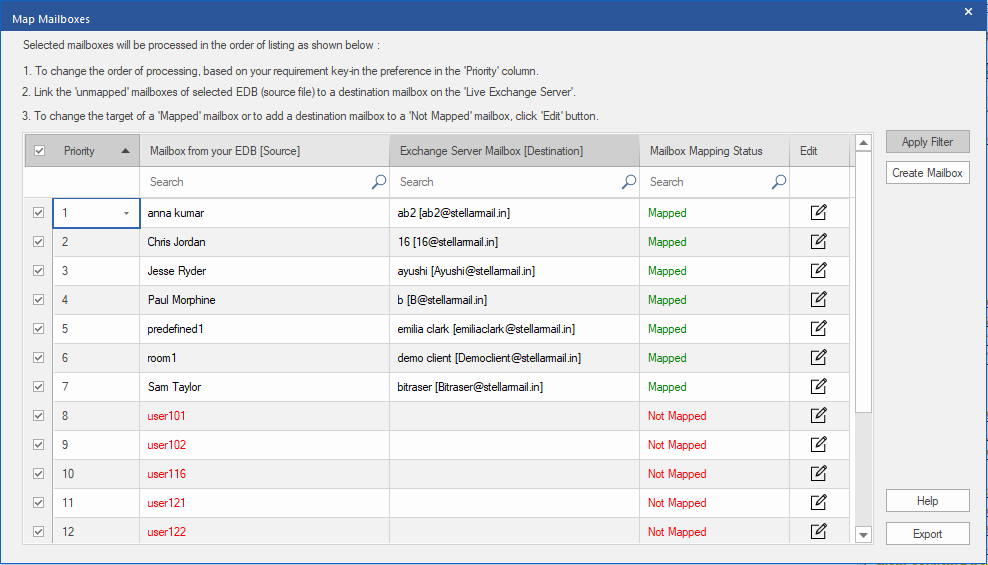
A Map Mailboxes window appears. The software auto maps the mailboxes on the destination live server. It also provides option to map the mailboxes manually or create a new user mailbox, if needed. It also allows you to change the mailbox recovery priority or apply filters to include/exclude specific mails. After mailbox mapping, click Export.
The software starts saving the mailboxes to the live Exchange. If you want to remove the pending mailboxes, click on the Remove button or click Stop All button to terminate the saving process.
When the Process Complete dialog box appears, click OK to close it. It also provides option to Resume saving mailboxes, if you’ve removed any mailboxes during export.
Exporting Mailboxes to Office 365
After the scan, select the mailboxes from the left preview pane and click Save from the main menu. A Save As window will appear.
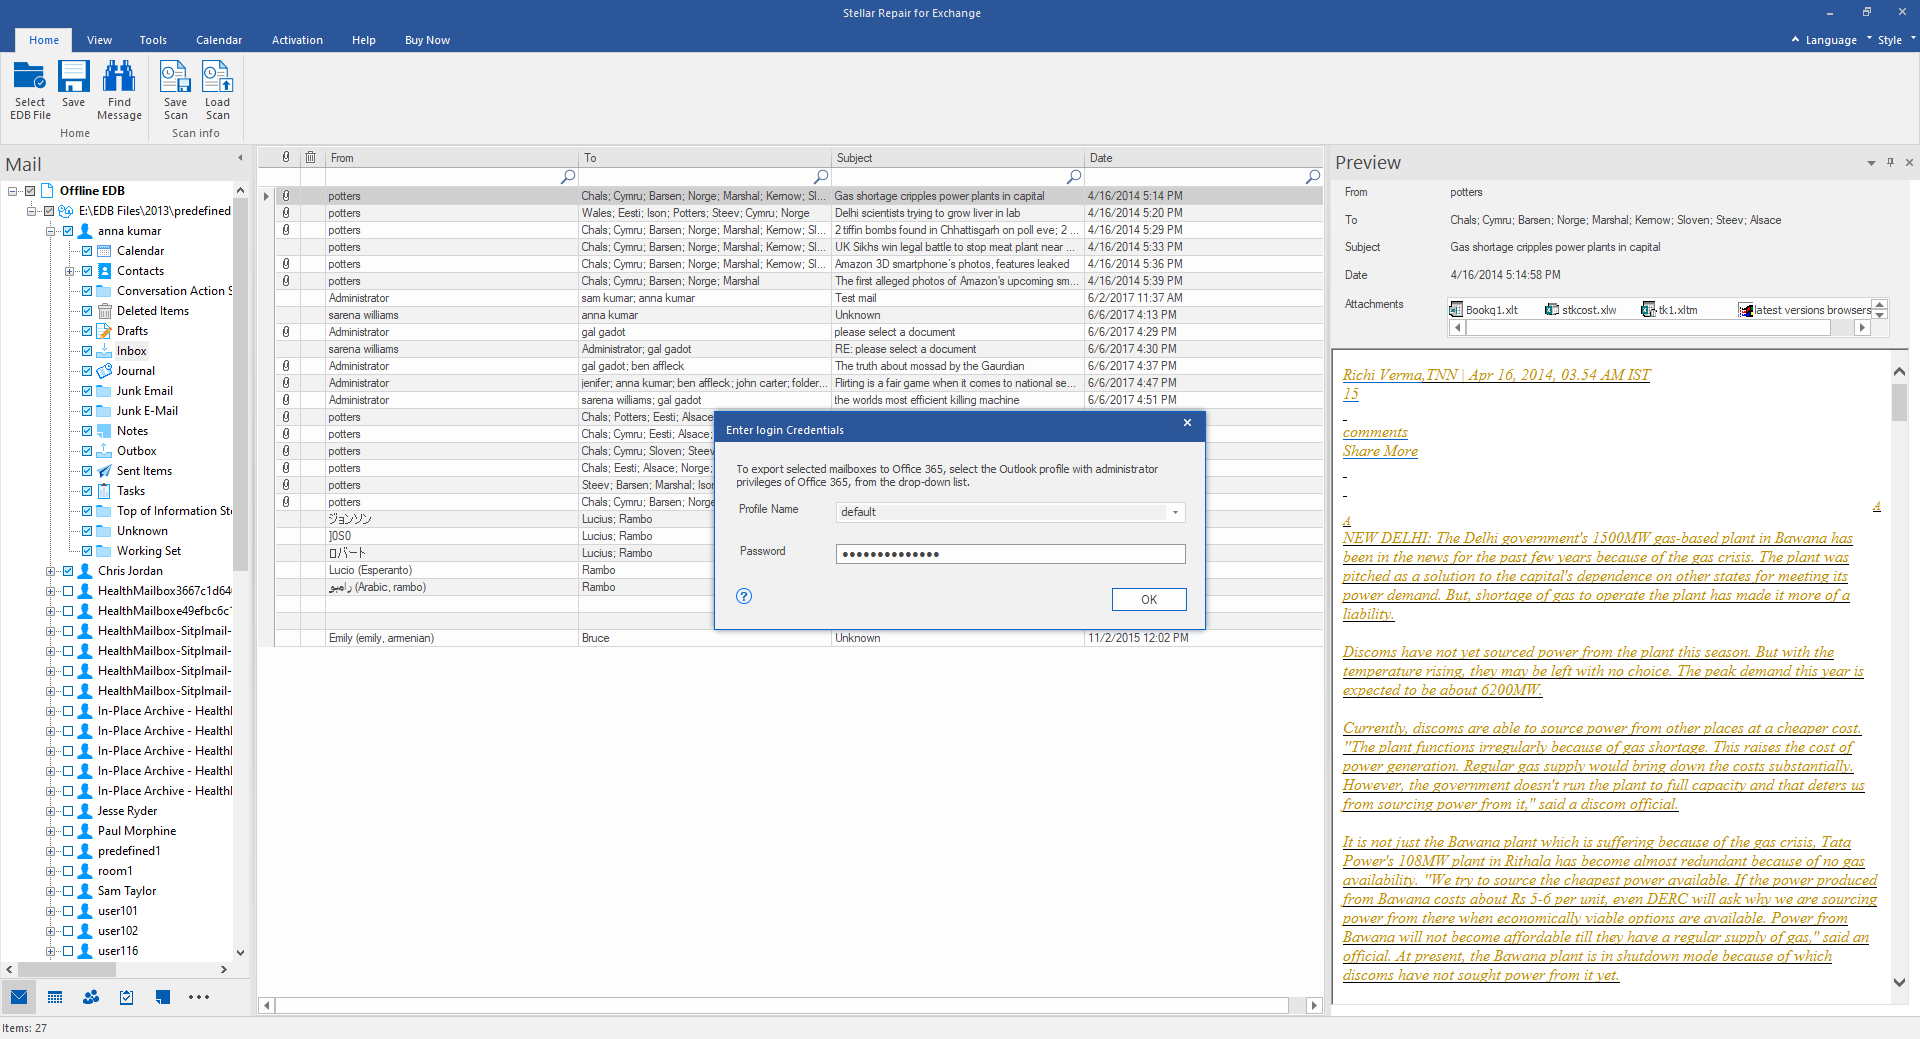
Select Export to Office 365 and then click Next. In the Enter Login Credentials window, select the configured Outlook profile with Administrator access, enter the Password, and then click OK.
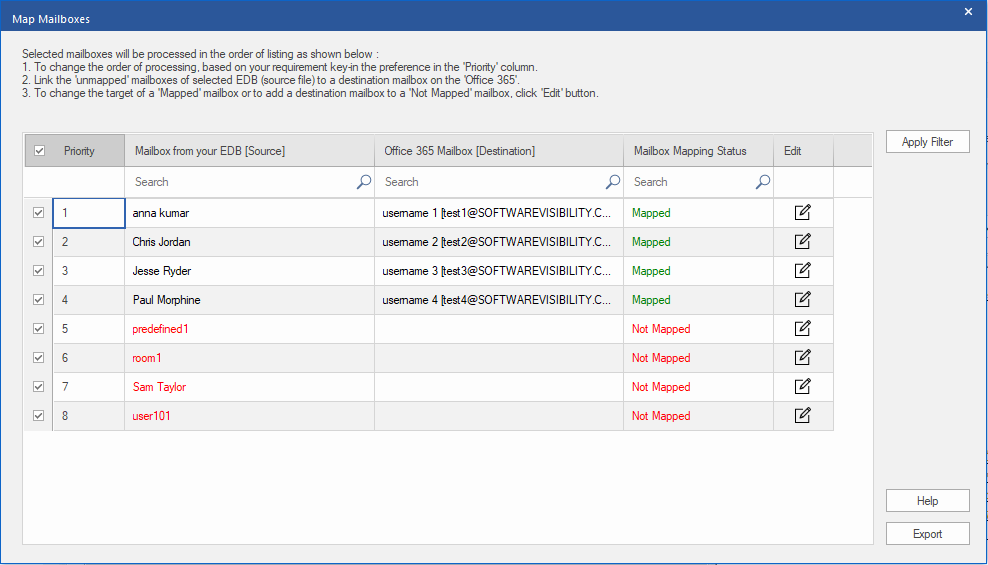
A new screen will appear to Map Mailboxes. You can also map the mailboxes manually and set the Mailbox Recovery Priority by changing the value in the Priority column. You can also Apply Filters to include/exclude specific mailboxes or mail items, based on the criteria such as email address, date range, etc. After mapping the mailboxes, click Export.
A Save dialog box appears displaying the saving status, along with Remove and Stop All buttons. You can choose to remove the pending mailboxes or click Stop All to terminate the process.
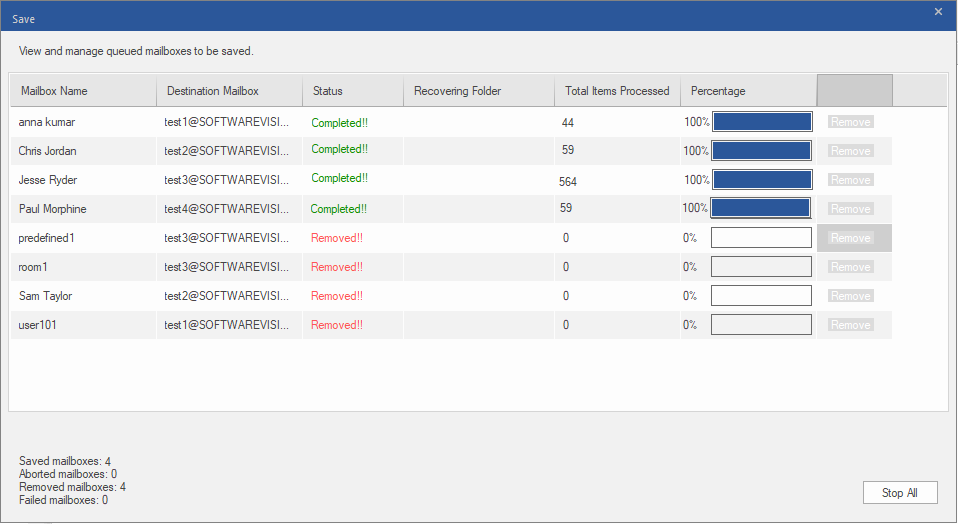
A Process Complete dialog box appears, displaying summary of saved mailboxes. You can resume saving the mailboxes that were removed. Else, click the OK button to finish the process.
Verdict
Stellar Repair for Exchange comes in handy when you face any issues with your Exchange server such as failure of Exchange Server, database corruption, infection from malware or ransomware, and missing log files. The software can extract data from dismounted or corrupted Exchange database and export it directly to a live Exchange server or Office 365. It is a must have tool for Exchange administrators as it reduces the recovery time to a minimum and helps get the business up and running again without any hassle.