
Creating a virtual switch in Hyper-V is a key step in managing virtual networks and enabling connectivity for your virtual machines. While you can do this through the Hyper-V Manager GUI, PowerShell provides a faster, scriptable, and more consistent way to manage your virtual network infrastructure, especially useful for automation or working on headless servers.
In this post, you’ll learn how to create an External, Internal, or Private virtual switch in Hyper-V using only PowerShell. If you prefer using a graphical interface, be sure to read our previous blog post on how to create and configure a Hyper-V Virtual Switch using Hyper-V Manager.
Table of Contents
Prerequisites
Before you begin, make sure:
- You are running Windows Server 2025 with Hyper-V installed.
- You are running PowerShell as Administrator.
- You have a physical network adapter available (for external switches).
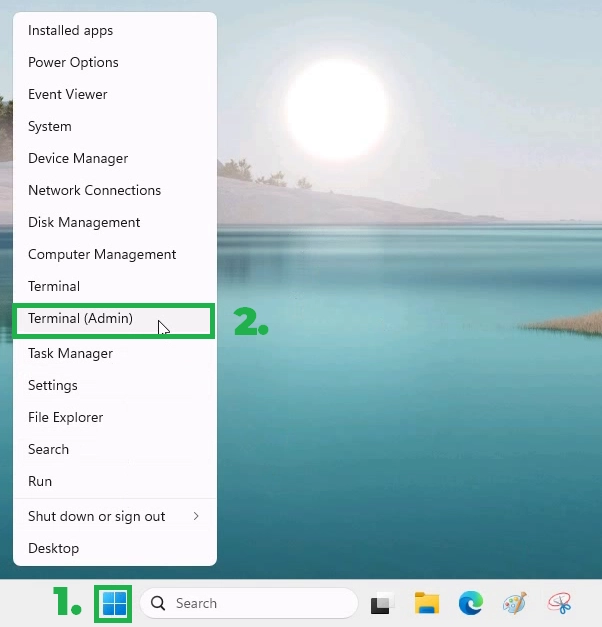
On the Windows Server 2025 desktop, right-click the Start button and select Terminal (Admin) to launch Windows PowerShell with administrative privileges.

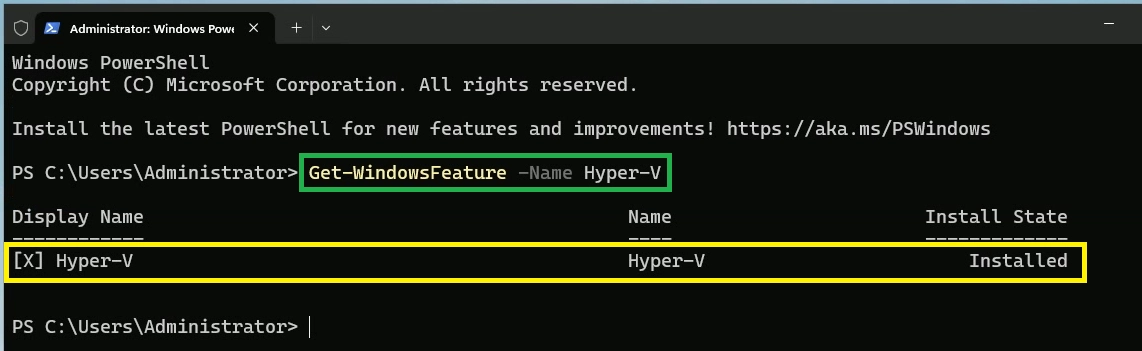
Let’s start by verifying whether Hyper-V is installed on the Windows Server 2025 machine. To verify if Hyper-V is installed, use the following PowerShell cmdlet:
Get-WindowsFeature -Name Hyper-V
If the Hyper-V role is not installed, you can enable it on the local server using the following PowerShell cmdlet:
Install-WindowsFeature -Name Hyper-V -IncludeManagementTools -RestartOnce the Hyper-V role is installed on the local server, the system will automatically restart to complete the installation.
Types of Hyper-V Virtual Switches:
There are three types of virtual switches:
- External: Connects VMs to the physical network.
- Internal: Allows communication between VMs and the host only.
- Private: Restricts communication to just the VMs on the same host.
.
Step-by-Step: How to Create a Hyper-V Virtual Switch Using PowerShell
Here’s how you can create a virtual switch using the New-VMSwitch PowerShell command:
.
Step 1: List Available Network Adapters
To create an External virtual switch, you need to know which physical network adapter to bind it to, enabling connectivity to the external network. You need to identify the network adapter name that you wish to use for the virtual switch.
Use the Get-NetAdapter cmdlet to retrieve a list of all physical network adapters available on your Hyper-V host:
Get-NetAdapter | select Name,InterfaceDescription
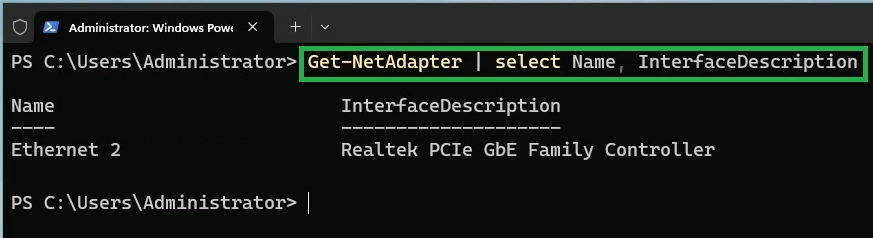
Make sure to note the Name or InterfaceDescription of the adapter you want to use.
In this example, we’ll use the Ethernet interface to bind it to the external virtual switch.
.
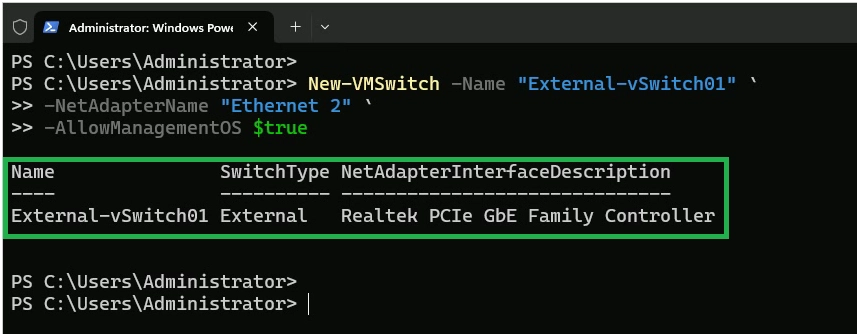
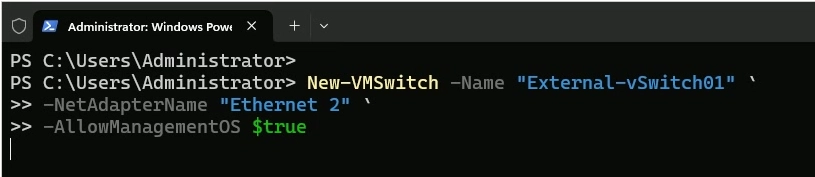
Step 2: Create an External Virtual Switch
New-VMSwitch -Name "External-vSwitch01" -NetAdapterName "Ethernet 2" -AllowManagementOS $trueHere’s what the parameters mean:
- -Name: Friendly name for your External virtual switch.
- -NetAdapterName: The physical NIC name, which you obtained by running the `Get-NetAdapter` cmdlet.
- -AllowManagementOS: The `$true` value is used to allow the host operating system to share the virtual switch and physical NIC with the virtual machines.


Let’s verify that the external virtual switch has been successfully created by running the following cmdlet:
Get-VMSwitch
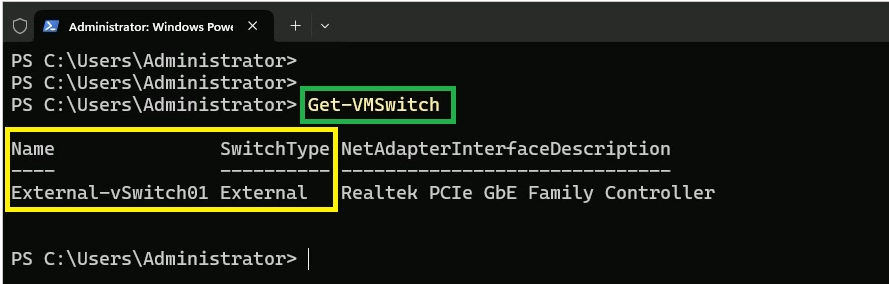
From the output, you can confirm that the external virtual switch, named External-vSwitch01, has been successfully created on this Windows Server 2025 machine. You should see your newly created switch listed with its type and associated NIC (if applicable).
.
Step 3: Create an Internal Virtual Switch
If you want to create an internal or private virtual switch, you can use the -SwitchType parameter with a value of either Internal or Private.
Lets create an Internal Virtual Switch:
New-VMSwitch -Name "Internal-vSwitch01" -SwitchType Internal


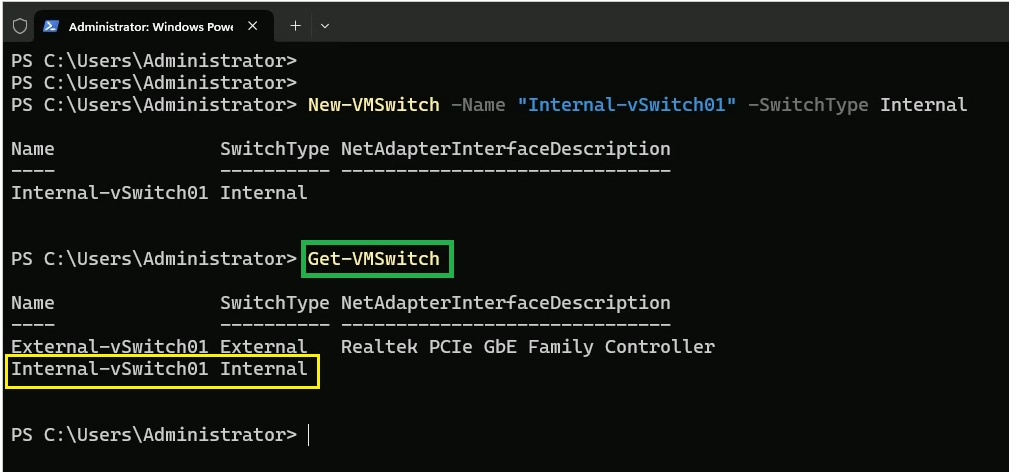
This allows communication between the VMs and the host, but it does not provide external network access.
.
Step 4: Create a Private Virtual Switch
To create a Private virtual switch for isolation, run the following cmdlet in PowerShell:
New-VMSwitch -Name "Private-vSwitch01" -SwitchType Private
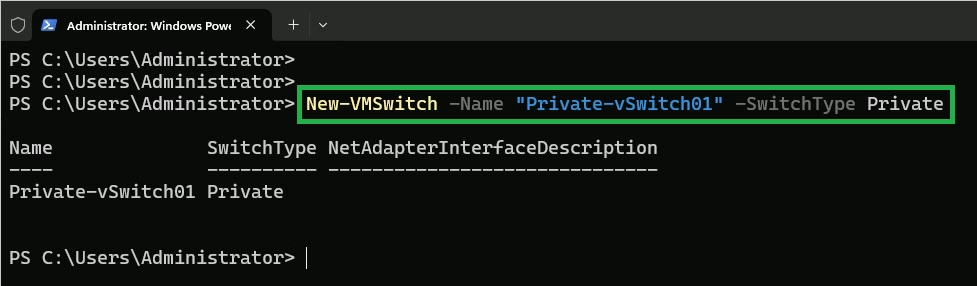
This restricts communication to only between the VMs connected to the switch, with no interaction with the host or external network.
To verify the Internal and Private switch creation:
Get-VMSwitch
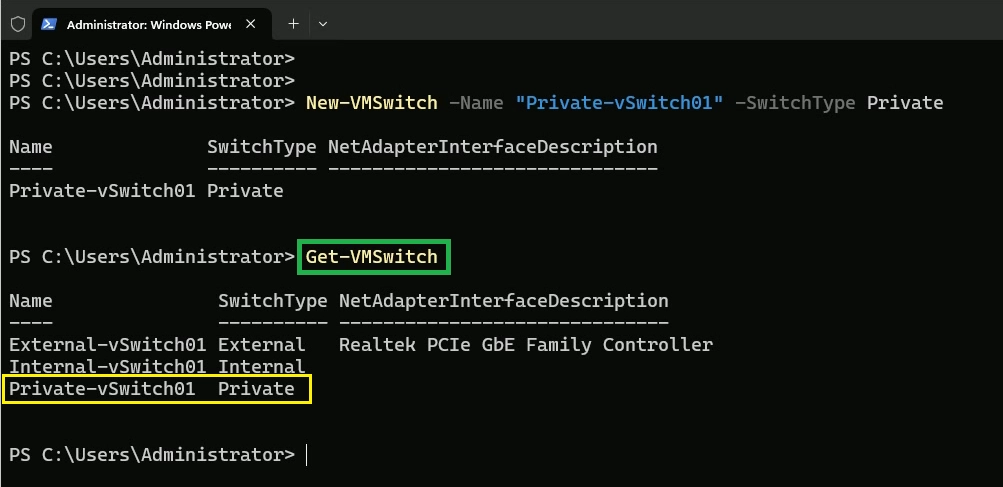
From the output, you can confirm that the internal virtual switch, named Internal-vSwitch01, and the private virtual switch, named Private-vSwitch01, have been successfully created on this Windows Server 2025 machine.
.
Delete an Existing Virtual Switch
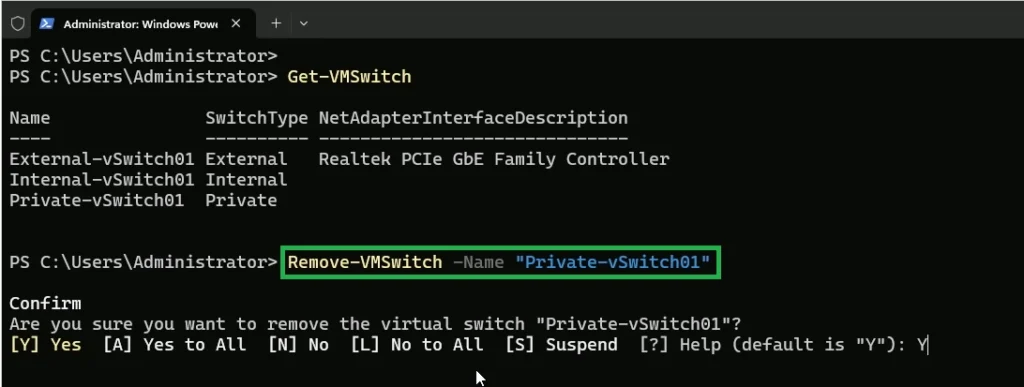
If you ever need to remove an existing virtual switch, you can use the Remove-VMSwitch cmdlet.
Remove-VMSwitch -Name "Private-vSwitch01"Here’s what the parameters mean:
- -Name: Friendly name for your External virtual switch.
Type “Y” and press Enter to remove the virtual switch “Private-vSwitch01”

To verify the switch deletion:
Verify that the Private-vSwitch01 has been successfully deleted and is no longer present in the switch list on the local Hyper-V server by running the following cmdlet:
Get-VMSwitch
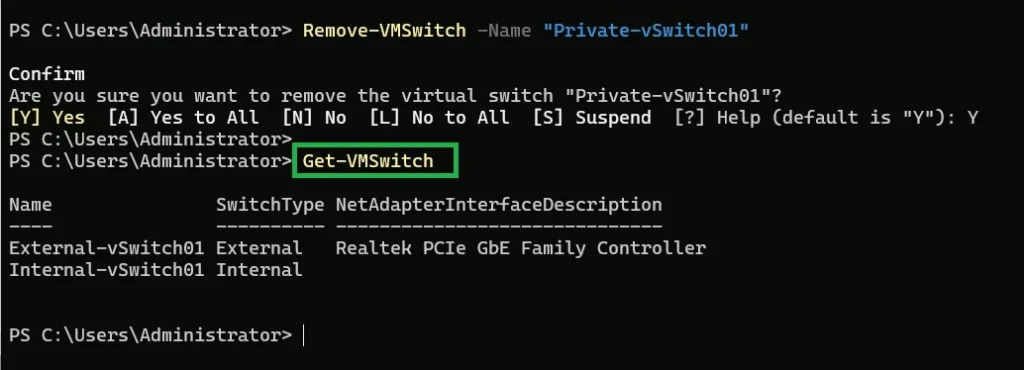
This will show the list of all current virtual switches. If the Private-vSwitch01 does not appear, it has been deleted successfully.
.
Connect a Virtual Switch to an Existing Virtual Machine
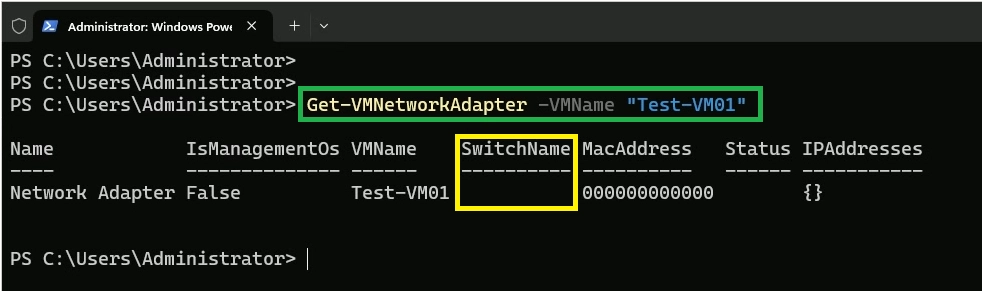
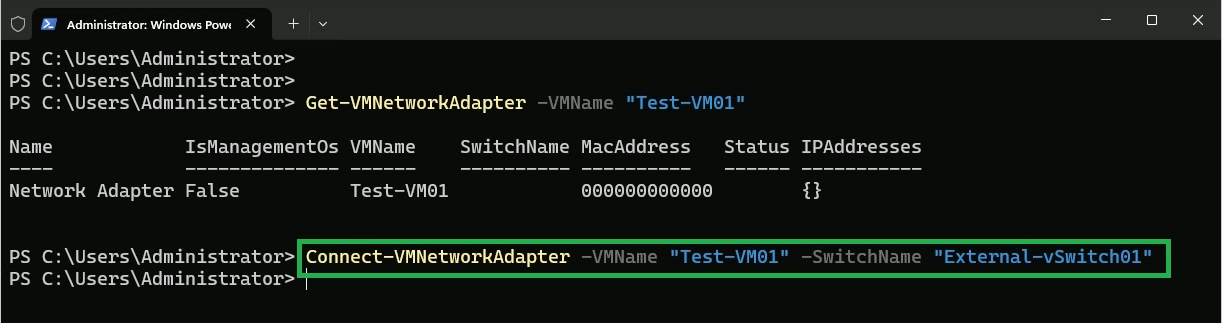
Run the following cmdlet to retrieve the list of network adapters present on the virtual machine Test-VM01:
Get-VMNetworkAdapter -VMName "Test-VM01"
Use the Connect-VMNetworkAdapter cmdlet to connect a virtual machine to your new virtual switch.
Connect-VMNetworkAdapter -VMName "Test-VM01" -SwitchName "External-vSwitch01"
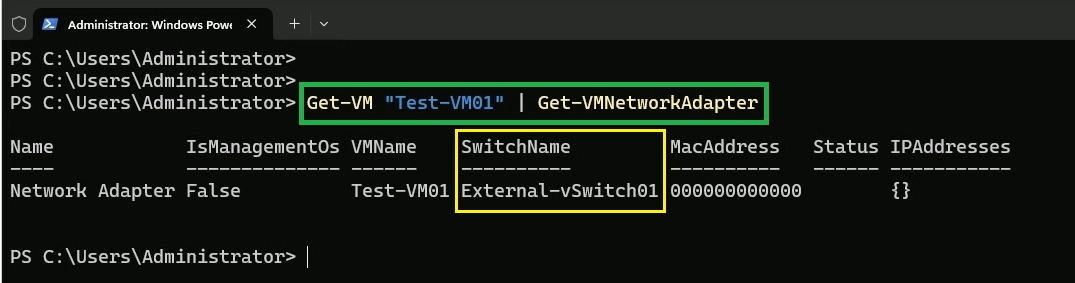
Run the following command again to find which virtual switch the network adapter of the Test-VM01 virtual machine is connected to:
Get-VMNetworkAdapter -VMName "Test-VM01"This will show you the network adapter name and the associated virtual switch.

Conclusion
PowerShell makes it simple and efficient to create and manage virtual switches in Hyper-V, ideal for IT professionals, lab environments, or server setups where a GUI is unavailable. Whether you’re building isolated VM networks or full-fledged virtual labs, mastering PowerShell for Hyper-V will save you time and enhance your automation capabilities.