In this post, we’ll walk you through how to configure VLANs in Hyper-V on Windows Server 2025, outlining the steps for setting up VLANs on virtual switches and virtual machines to improve network isolation, security, and management flexibility.
In Hyper-V, VLANs enable the creation of multiple logical networks within a single physical network, providing network isolation and enhanced management flexibility. With Hyper-V’s VLAN feature, you can assign VLAN IDs to VMs, allowing them to communicate with other devices in the same VLAN while remaining isolated from devices in different VLANs.
This configuration enhances network security and manageability by ensuring that virtual machines operate independently on the same physical network, without interfering with each other.
We can use Hyper-V Manager to graphically configure VLANs in Hyper-V, or we can use Windows PowerShell to use the command-line interface to create and manage Virtual LANs in Hyper-V. In this guide, we will use both methods to configure VLANs in Hyper-V.
Table of Contents
Prerequisites
Before diving in, ensure you have the following:
- A machine running Windows Server 2025 with the Hyper-V roleenabled.
- A virtual switchalready created in Hyper-V.
How to Configure VLANs in Hyper-V Using Hyper-V Manager
Hyper-V Virtual Switches are virtual network switches that connect VMs to the physical network and facilitate communication between virtual machines within a Hyper-V environment. They manage network traffic between VMs and handle their connectivity to external networks.
Configuring VLANs on virtual switches allows you to assign VLAN tags to VMs, helping to isolate and manage network traffic while ensuring secure and structured communication within the virtual environment.
This is going to be a two-step process. In the first step, you will configure an existing Hyper-V virtual switch to use a VLAN, and in the second step, you will configure VLANs for an existing Hyper-V virtual machine.
Step 1: Configure a Virtual Switch to use a VLAN
Open the Hyper-V Manager.


In Hyper-V Manager, click Virtual Switch Manager in the Actions pane on the right.


In the Virtual Switch Manager, under the Virtual Switches section on the left, select the virtual switch you want to configure.


Under VLAN ID in the right pane, select Enable virtual LAN identification for management operating system and then type a number for the VLAN ID for network communication. When finished, click OK to save your changes.

All traffic that goes through the physical network adapter connected to the virtual switch is tagged with the VLAN ID you set on the virtual switch and virtual machines.
Step 2: Configure VLANs for Hyper-V Virtual Machine
To assign a VLAN ID to a virtual machine’s network adapter, follow the steps below.
In Hyper-V Manager, right-click the VM and select Settings.

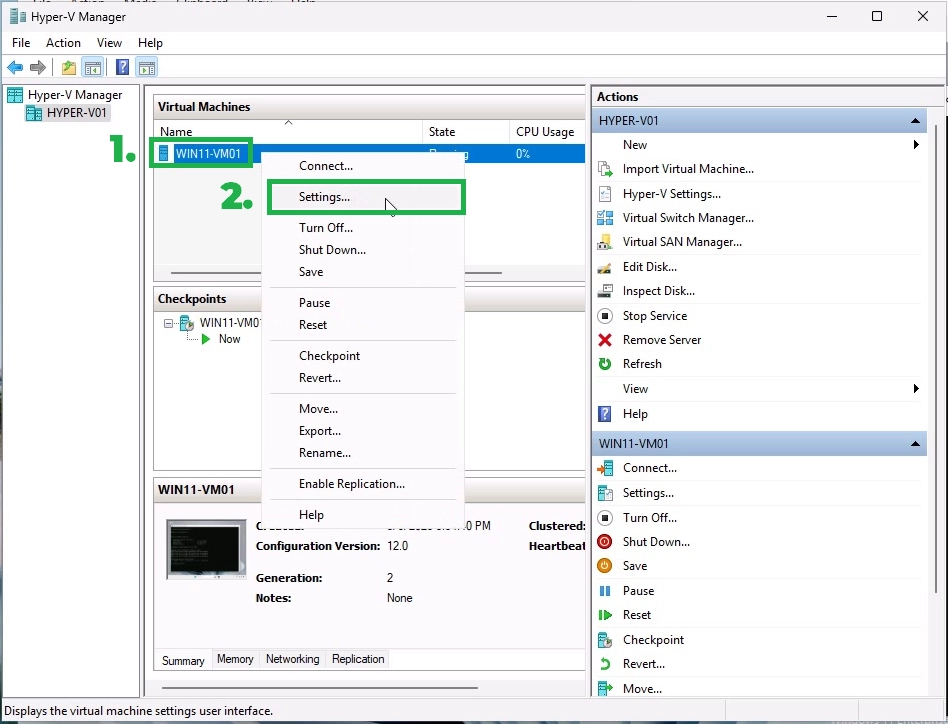
Under Hardware, click on Network Adapter.


1. Select the checkbox next to Enable VLAN identification.
2. Enter the VLAN ID that you created earlier. In this example, we have used VLAN ID 25.
3. Click OK to save the changes.


Note: VLAN IDs must match across the VM, host, and physical switch port.


Step 3: Verify Network Connectivity
After VLAN configuration, verify that your VM can communicate with the correct VLAN.
Ping another VM or device on the same VLAN.


You can use tools such as ipconfig, ping, or tracert to diagnose connectivity.
How to Configure VLANs in Hyper-V via PowerShell
You can also assign VLANs using PowerShell. Here’s a quick example:
Run the following command in PowerShell and press Enter to set up VLAN ID 25 for the external virtual switch named “External-vSwicth01”.
Run the following command in PowerShell and press Enter to set the virtual switch in the management OS to the Access mode. Traffic sent by this virtual switch is tagged with VLAN ID 25.
Set-VMNetworkAdapterVlan -ManagementOS -VMNetworkAdapterName "External-vSwitch01" -Access -VlanId 25Here’s what the parameters mean:
- -VMNetworkAdapterName: This parameter specifies the name of your virtual switch.
- -VlanId: This parameter defines the VLAN ID.


To check the VLAN settings of your Hyper-V virtual switch, run the following command in PowerShell and press Enter:
Get-VMNetworkAdapterVlan -ManagementOS -VMNetworkAdapterName "External-vSwitch01"

Run the following command in PowerShell and press Enter to set up VLAN ID 25 for the virtual machine WIN11-VM01.
Set-VMNetworkAdapterVlan -VMName "WIN11-VM01" -Access -VlanId 25Here’s what the parameters mean:
- -VMName: This parameter specifies the name of your virtual machine.
- -VlanId: This parameter defines the VLAN ID.


To check the VLAN settings of your virtual machine, run the following command in PowerShell and press Enter.
Get-VMNetworkAdapterVlan -VMName "WIN11-VM01"

Conclusion
Configuring VLANs in Hyper-V is a powerful way to manage network traffic, enhance security, and improve the organization of your virtualized environment. Whether you prefer using the Hyper-V Manager or the Windows PowerShell, both methods provide a straightforward way to assign VLAN IDs to virtual machines and ensure proper network segmentation.
By following the steps outlined in this guide, you can efficiently isolate and control traffic between VMs, connecting them securely to external networks while maintaining optimal performance. Remember to coordinate with your network team to ensure VLAN configurations align with your physical network infrastructure for seamless communication.