Blogs on Windows Server By MSFT WebCast
Windows Server 2019

Backup and Restore An Active Directory Integrated DNS Zone

In this article, we will learn the steps to Backup and Restore an Active Directory Integrated DNS zones in windows server 2019. DNS is one of the core components of Active Directory Domain Services. The backup of the AD integrated DNS zones is very important.

By default, DNS service stores all information such as logs, basic DNS files, and backups under the DNS folder located under “%systemdrive%WindowsSystem32”.  Active Directory Integrated DNS stores, its data in the Active Directory database, we can back it up by using Active Directory backup and restore it by using AD restore. The Active Directory restoration process is time-consuming and it leads to increased downtime, which impacts productivity.

Luckily, it’s possible to back up a DNS server using the DNSCMD command-line tool and PowerShell.

How to Backup the AD Integrated DNS zone:

In this article, we will use the DNSCMD command to backup (export) mylab.local Active Directory Integrated DNS zone.

Open Windows PowerShell (admin) by right-clicking on the start button.

To back up the mylab.local zone locally on a DNS server, you’d run the below command on the DNS server:

dnscmd /zoneexport mylab.local mylab.local.dns.backup

This command creates a copy of the mylab.local zone to the %systemroot%system32dnsbackupmylab.local.dns.backup file.

How to Restore the AD Integrated DNS zone using the GUI method:

In the DNS Manager Console. Expand the Server, then right-click Forward Lookup Zone and Click New Zone.

On the New Zone Wizard, Click Next.
On the Zone Type Wizard, select Primary zone and unchecked the Store the zone in Active Directory (available only if DNS server is a writable domain controller).
On the Zone Name Wizard, type the name of the zone being restored. In our case, it is mylab.local. Click on the Next.
Rename the file from mylab.local.dns.backup to mylab.local.dns (remove the .backup extension).
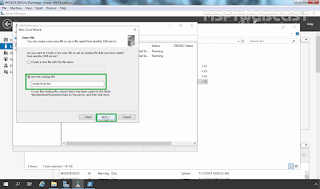
On the Zone File Wizard, select the option Use this existing file and give the path of the file (our file is stored in %systemroot%system32dns so we have given mylab.local.dns). Click on Next.
On the Dynamic Update wizard page, select Do not Allow dynamic updates and Click Next.
On the Completing the New Zone Wizard page, click Finish.
Right-click on mylab.local zone and select Properties.
Click the Change button at Type: Primary field.
On the Change Zone Type page, make sure the Primary zone is selected and select the option Store the zone in Active Directory (available only if DNS server is a domain controller) and click OK.
Click Yes to accept the change.
Select Secure only at the Dynamic updates field.
Click on Apply and Ok button to convert standard primary zone into Active Directory Integrated DNS zone.

Finally, we have Active Directory Integrated DNS Zone up and running, restored from the existing backup file.

I hope you will find this information useful. Thank you!

Link to my video on How to Backup-Restore An Active Directory Integrated DNS Zone.
Related posts

Configure Radius Server for VPN on Windows Server 2019.

Manhar Rakholiya
5 years ago

How to Install and Setup DNS Service on Windows Server 2019

MSFT WebCast
5 years ago

How to Configure NIC Teaming in Windows Server 2019

MSFT WebCast
6 years ago
Exit mobile version